W2R Schematics User Guide
The complete guide to the professional repair-schematics platform — a cloud library of board documentation and three linked viewers that take you from “this phone is dead” to “this is the exact pin to check.”
Watch first
Subscribe on YouTube-
How to sign in
-
How to activate your licence
Understanding the software
01What W2R Schematics is
W2R Schematics is a Windows desktop application for board-level repair of mobile phones and consumer electronics. It is the reference tool you keep open on the bench next to the microscope.
When a phone comes in dead, you need three things before you touch the board with a probe: the schematic that tells you how the circuit is supposed to work, the boardview that tells you where on the physical PCB each component and test point actually sits, and — ideally — a known repair procedure from someone who has already fixed this exact fault on this exact model.
W2R Schematics puts all three in one window, connected to a cloud library of board files that you browse and open directly. You do not hunt through folders of leaked PDFs on a hard drive. You sign in, find the model, and open it.
The four things it does:
- A cloud library of board documentation. Schematics, boardviews and hardware-solution guides, organised by manufacturer and model, streamed to you on demand.
- Three specialised viewers. One for schematics, one for physical boardviews, one for annotated repair guides — each built for its job rather than a generic document reader.
- Cross-linking between them. Double-click a net name in the schematic and it lights up on the physical board. This is the feature that saves the most time, and it is covered in §18.
- A community repair-solutions layer. Repair procedures pinned to the specific nets and components they concern, published by W2R and by other technicians — and you can publish your own (§20, §21).
02The core idea: three views of one board
Everything in W2R Schematics follows from one idea. A single phone board is described by three different kinds of document, and they are far more useful when they talk to each other.
The circuit diagram. Tells you what should be connected to what, and what voltage should be where. Read it to understand the fault.
The physical PCB. Every component, pad, via and net drawn in its real position, with layers you can peel back. Read it to find the fault.
An annotated repair guide — jumper routes, replacement parts, known-good procedures, drawn over the board. Read it to fix the fault.
The schematic and the boardview open side by side and become linked. When a pair is linked, a search in one drives the other:
In the schematic, double-click any net or component name. W2R Schematics searches the linked boardview for it, highlights it, and zooms to it. It works in reverse too: double-click a pin on the board and the schematic jumps to the page where that net appears.
That single gesture replaces the slowest part of the job — carrying a net name from the schematic in your head, then scanning the board to find where it physically lands.
03Who it's for
W2R Schematics is built for repair technicians and repair shops doing component-level work: micro-soldering, chip-level fault finding, tracing shorts, diagnosing no-power and no-charge faults, and reworking BGA packages.
It is a reference and diagnosis tool, not a design tool. You cannot draw a schematic or lay out a PCB with it. It reads board documentation, it does not author it.
Access is by licensed subscription. Your account carries a plan with an expiry date, and is tied to the computer you activate it on — see §9.
04What are the system requirements?
Minimum
| Operating system | Windows 10 (version 1809 or later), 64-bit, or Windows 11 64-bit |
| Processor | Intel Core i3 or AMD equivalent, 2.0 GHz or faster |
| Memory | 4 GB RAM |
| Disk space | 500 MB, plus room for downloaded documents |
| Graphics | DirectX 11 compatible, 1280 × 720 or higher |
| Network | An internet connection. The library, sign-in and updates all need it. |
Recommended
| Processor | Intel Core i5 / i7 or AMD Ryzen 5 / 7, 3.0 GHz or faster |
| Memory | 8 GB minimum, 16 GB or more for large multi-layer boards |
| Graphics | Dedicated card with 2 GB VRAM, 1920 × 1080 or higher |
| Storage | An SSD |
| Network | Broadband, 10 Mbps or faster |
| Display | 24″ or larger — you will be running a schematic and a board side by side |
Microsoft Edge WebView2 Runtime is required and is installed automatically if it is missing.
05How do I install W2R Schematics?
- Run the installer. Administrator rights are required.
- Follow the on-screen steps. You can opt in to a desktop icon.
- The installer bundles the Microsoft Visual C++ Redistributable and the WebView2 Runtime, and installs them if your machine does not already have them.
- Launch from the Start Menu.
If Smart App Control is switched on, Windows 11 will block W2R Schematics from starting. The app detects this and shows you instructions. To fix it: open Windows Security → App & Browser Control → Smart App Control settings → Off, then restart the computer.
Your antivirus may also need to be told to allow the application, and your firewall must permit network access for the library and updates to work.
Getting started
06Signing in
W2R Schematics opens on a sign-in window and stays there until you are through it. There is no offline or guest mode — the library lives on the server and each file is streamed as you open it.
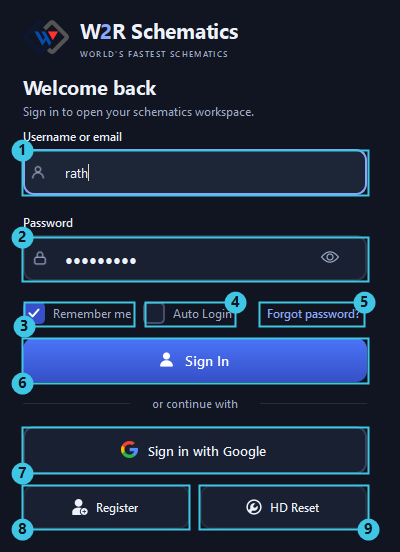
- 1 Username or email
- Either works. Press Enter to sign in without reaching for the mouse.
- 2 Password
- The eye at the right of the field reveals what you typed.
- 3 Remember me
- Fills this form again next time. It does not sign you in.
- 4 Auto Login
- Goes further: skips this window entirely on the next launch. You can turn it off again from the profile card once you are inside (§26). Leave it off on a shared computer.
- 5 Forgot password?
- Resets it by emailed code — see §8.
- 6 Sign In
- Stays grey until both fields have something in them.
- 7 Sign in with Google
- Opens your normal browser for Google's consent screen and returns you here. The Google account must already be registered with W2R.
- 8 Register
- Creates an account without leaving the app — §7.
- 9 HD Reset
- Releases the licence from the PC that currently holds it — §9.
There is deliberately no minimise button on this window. Close it and the application exits; sign in and the full window takes its place.
07Creating an account
Register swaps the window over to sign-up, and the panel changes sides — the form is now on the right. It runs in two steps: prove the address is yours, then build the account on it. Nothing is created until the last step succeeds.
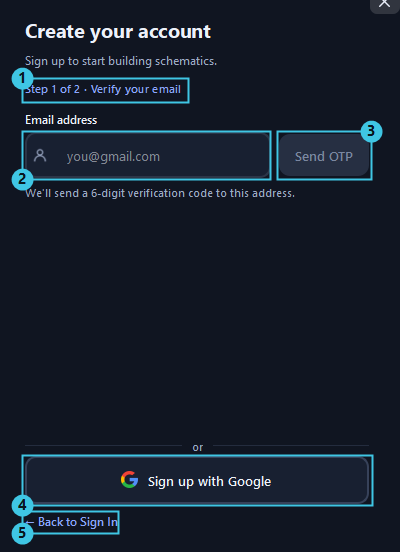
- 1 Step 1 of 2 · Verify your email
- The step label tracks where you are and changes as you go.
- 2 Email address
- The code goes here, so it must be an address you can read.
- 3 Send OTP
- Grey until the address looks valid.
- 4 Sign up with Google
- Skips the code step; you still choose a username and password afterwards.
- 5 Back to Sign In
- Abandons the sign-up. Nothing has been created at this point.
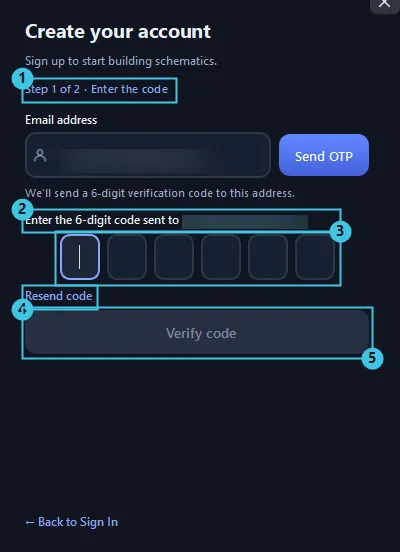
- 2 The address the code went to
- Spelled out in full, so you can see it is the one you meant.
- 3 Six boxes, one digit each
- The cursor starts in the first and advances as you type.
- 4 Resend code
- If it does not arrive within a minute or two.
- 5 Verify code
- Grey until all six boxes are filled.
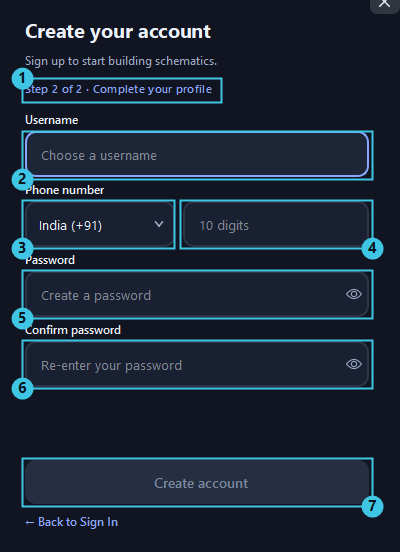
- 2 Username
- What you will sign in with, and what support will ask for.
- 3 Country
- Sets the dialling code.
- 4 Phone number
- Ten digits for India; the length follows the country.
- 5 Password
- With an eye to reveal it.
- 6 Confirm password
- Must match.
- 7 Create account
- Grey until all four fields are valid. Each box outlines as it passes, so you can see which one is still holding you up.
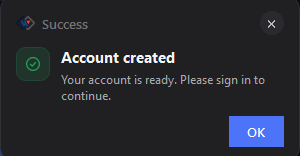
A new account starts on the Free plan, which cannot open the main library. The first sign-in will say so and point you at an upgrade. Activate it from a plan card on the home page (§11) or through the WhatsApp button beside it.
08What if I forget my password?
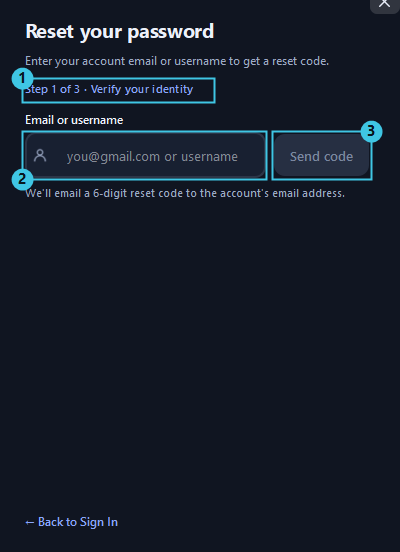
The reset runs in three steps: identify yourself, enter the code that is emailed to you, then choose a new password. Email or username both work, and the code always goes to the address already on the account — never to one typed here.
This is also the way out if you signed up with Google and never had a password. Set one here, and you can then use HD Reset, which needs one.
09Your account, plan and device
Plans and expiry
Your account carries a plan with an expiry date. The days remaining sit in the title bar, and the plan and date are in the profile card (§26). When a plan runs out, sign-in is refused with a Plan Expired message rather than silently degrading — so you are never halfway through a repair before you find out.
How do I move W2R Schematics to another PC?
A licence is tied to the computer it was activated on. A different machine — or the same one after a motherboard swap, a disk replacement or a Windows reinstall — is refused with a hardware-ID error. HD Reset on the sign-in window releases the licence so the next sign-in can claim the new machine.
- Fill the form first
- The reset is authenticated with your username and password, so type them into the sign-in fields before pressing the button.
- It releases every device
- Not just the old one. Whatever was signed in will have to sign in again.
- Three in any 30 days
- A rolling limit. The refusal names the date the oldest one drops out of the window.
- No password?
- A Google-only account may not have one. Set one with Forgot password first (§8).
Why is my sign-in refused?
Each failure gives you a specific dialog rather than a generic error, and most of them offer a WhatsApp support button that opens a chat with your username already filled in. Every message and what to do about it is listed in §29.
10The main window
One window holds everything: the library on the left, your open documents in the middle, and the account and view controls along the top.
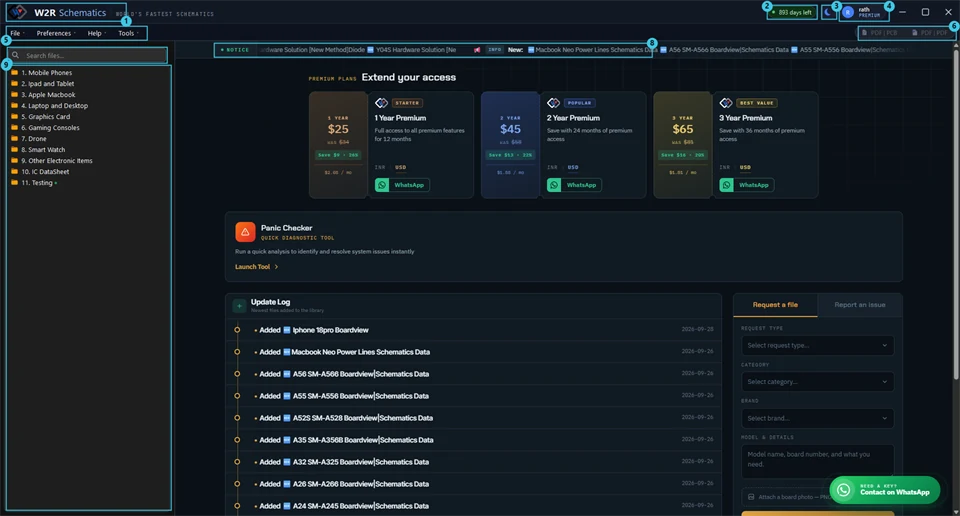
- 1 Product mark
- Returns you to the home page from anywhere.
- 2 Days remaining
- What is left on your plan, counted down daily.
- 3 Light / dark
- Switches the whole application, viewers included.
- 4 Account chip
- Your name and plan; opens the profile card (§26).
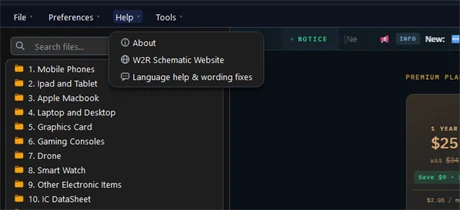
- 5 Menu bar
- File, Preferences, Help, Tools.
- 6 Split view
- PDF | PCB and PDF | PDF — see §14.
- 7 Library search
- Filters the tree as you type — §13.
- 8 Notice and news
- A ticker of service notices and newly added files.
- 9 The file tree
- The whole library — §12.
The menus
| Menu | Holds |
|---|---|
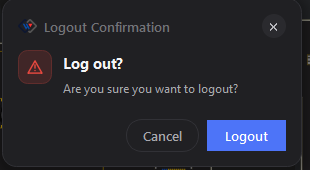
| File | Logout · Exit |
| Preferences | PCB Theme · File Tree Text Size · PCB Viewer · Language — see §24 |
| Help | About · W2R Schematic Website · Language help & wording fixes |
| Tools | Utilities, filled in as they apply to the open document — see §23 |
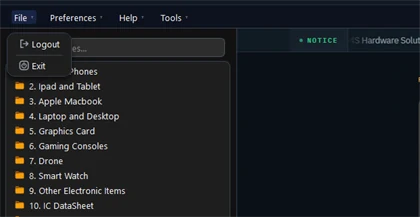
The sidebar
The library tree sits on the left. Drag the divider to resize it, or click the small ‹ › chevron on the divider to collapse and restore it.
11The home page
What you land on after signing in, and what the product mark returns you to. It is the first tab, and it is pinned — it cannot be closed.
- Extend your access
- Plan cards — one, two and three year — with the current price, the saving, and a WhatsApp button that opens a chat with sales.
- Panic Checker
- A quick diagnostic. Launch Tool analyses the application and the machine and reports anything that would stop it working.
- Update Log
- The newest files added to the library, newest first, with the date each arrived — the fastest way to see whether a board you need has landed.
- Request a file · Report an issue
- Two tabs of one form: request type, category, brand, the model and details, and a photo of the board. The second tab sends a fault rather than a request.
The green Contact on WhatsApp bubble in the bottom-right corner follows you through the whole application, not only this page.
Finding and opening board files
12The file tree
The sidebar is your library, arranged category → brand → model → file. It is hosted in the cloud, and it is the only way files get into the app — there is deliberately no File → Open. Nothing is downloaded until you open it.
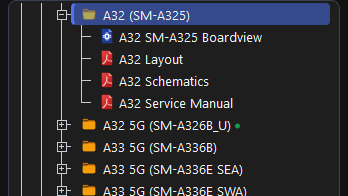
- Boardview
- Opens in the board viewer (§16).
- Layout · Schematics · Service Manual
- PDFs, opened in the schematic viewer (§15).
- A green dot
- This model carries at least one repair solution (§20).
Opening files
| Gesture | Result |
|---|---|
| Single-click a folder | Expands or collapses it |
| Single-click a file | Selects it |
| Double-click a file | Downloads and opens it in a tab |
| Select several files, then double-click | Queues them and opens them one after another |
While a file downloads, a progress overlay covers the window showing the filename, the percentage and the size. You can cancel it with the Cancel button or by pressing Esc.
Downloaded documents are held in memory for the session, not saved to your disk. Close the tab and the file is gone; open it again and it is fetched again. Nothing accumulates in a cache folder for you to manage.
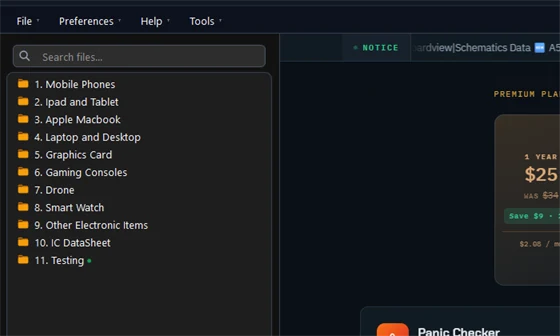
Text size
Three ways to the same setting: Ctrl + / − / 0 while the tree has focus, the A−/A+ buttons in the search row, or Preferences → File Tree Text Size, which works from anywhere.
13Searching the library
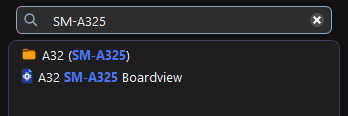
The search box sits above the tree. Type any part of a model name or board number and the tree collapses to the matches, with the matched text picked out. The × button clears the search and restores the full tree.
14Tabs and split view
Every document you open becomes a tab, colour-coded by type: orange for a boardview, red for a PDF. Ctrl Tab cycles forward and Ctrl Shift Tab back.
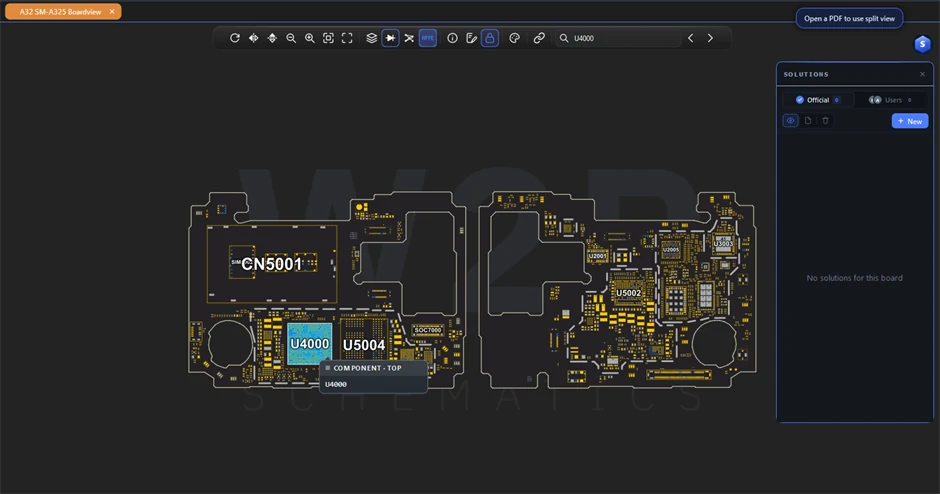
- PDF | PCB
- A schematic on one side, the board on the other — the usual pairing when you are tracing a net from the diagram onto the hardware.
- PDF | PDF
- Two documents — a schematic beside the service manual, say, or a known-good board revision against the one on your bench.
- Swap
- Exchanges the left and right panels.
- The link button
- On either toolbar. Ties the two halves together, so jumping to a part in one moves the other to match.
Ten schematics and ten boards can be open at once. Beyond that you are told to close something first.
The viewers
15The schematic viewer
Opens Layout, Schematics and Service Manual files. Pages are drawn on demand, so a three-hundred-page manual opens as quickly as a single sheet, and the fine print stays sharp at high zoom.
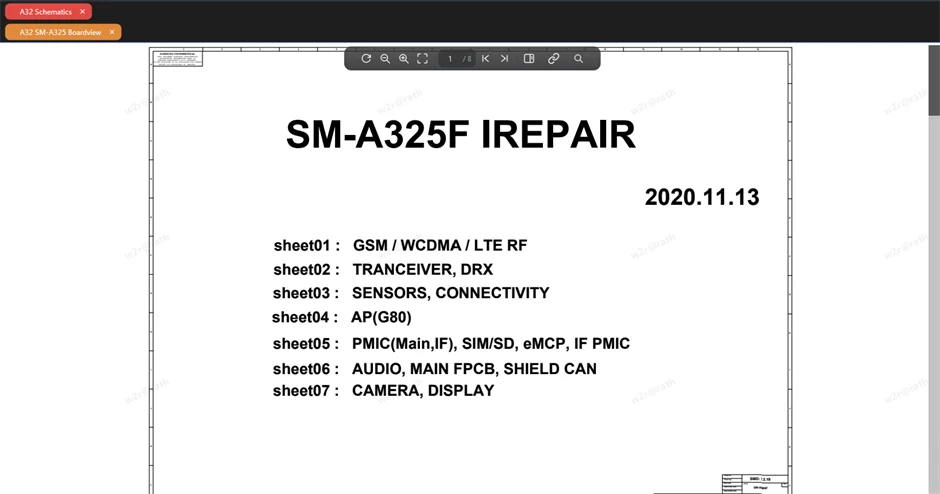

The toolbar
| Control | Does |
|---|---|
| Rotate | Turns the page 90° clockwise |
| Zoom out · Zoom in | Also Ctrl+wheel over the page |
| Fit | Fits the whole page in the window |
| Page box | Type a page number and press Enter to jump; the total is printed beside it |
| First · Last page | Jumps to either end |
| Occurrences panel | Lists every hit for the current search with its context — click one to jump straight to it, far faster than pressing Next twenty times |
| Link | Ties this half of a split view to the other |
| Search | Ctrl F; the arrows step between hits |
Mouse
| Wheel | Zooms, centred on the cursor. Point at what you want to look at and scroll. |
| Left-drag on text | Selects text |
| Left-drag on blank area | Pans |
| Right-drag | Pans |
| Double-click a word | Selects it and searches for it in the linked boardview. This is the core gesture — see §18. |
Right-click menu
Copy, Paste, Find Component in… and Find Net in… — the last two name the linked boardview tab explicitly, and let you say whether the text you selected is a component reference or a net, rather than letting the app guess.
Every sheet carries your account name as a watermark, tiled across the page. It is there on purpose: a leaked screenshot can be traced back to the account it came from, and it is why the library can carry the material it does.
16The board viewer
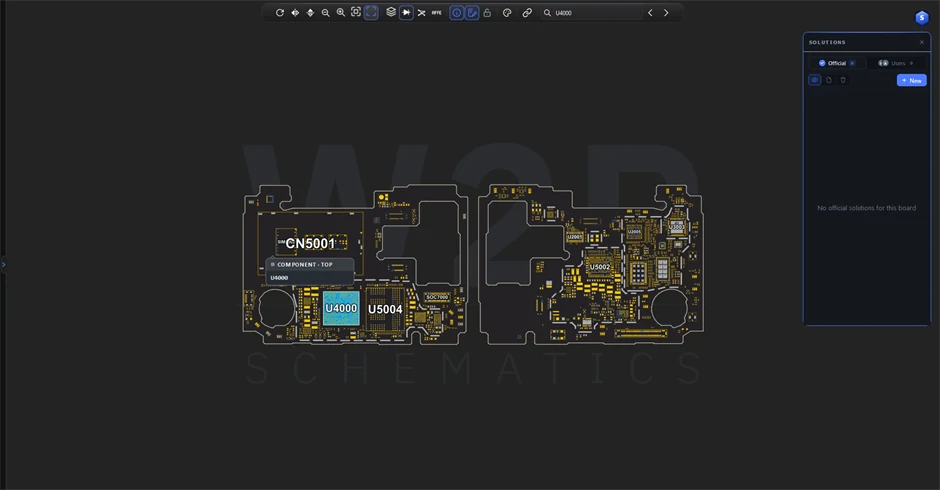
Opens Boardview files: the physical PCB, drawn to scale, with every component, pad and net in its real position. The board is drawn live rather than as a picture, so you can zoom to a single pad without it turning to mush.
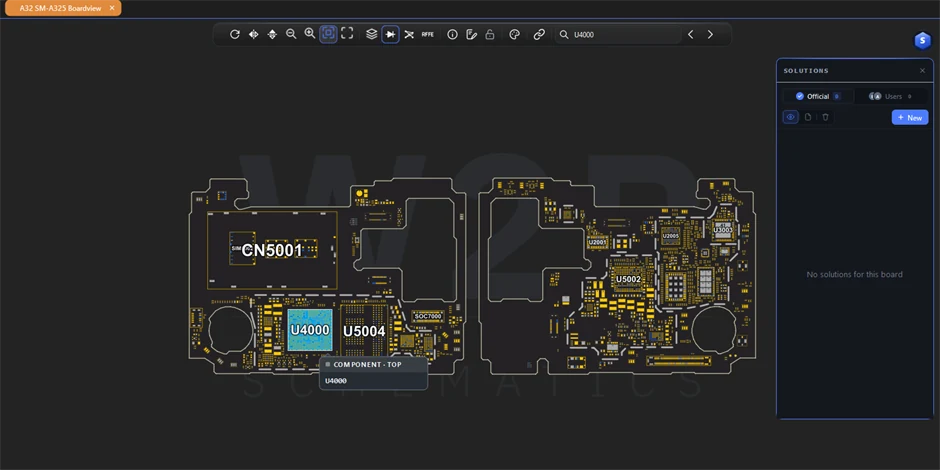

- 1 Rotate · flip
- Turn the board 90°, or mirror it horizontally or vertically — for when you are looking at the underside of the board in your hand.
- 2 Zoom out · in · fit
- Ctrl+wheel does the same over the board. Fit whenever you lose your bearings.
- 3 Full screen
- F11. Esc comes back.
- 4 Trace layers · diode readings · ratsnest · RFFE
- The four display toggles — they change what is drawn, not how it is framed (§17).
- 5 Board information · solution notes
- Two panels about the open board.
- 6 Lock board
- Freezes pan and zoom, so a stray drag cannot move what you were looking at — useful once you have framed a shot under the microscope.
- 7 Board colour
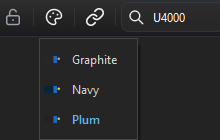
- Graphite, Navy or Plum.
- 8 Link
- Ties this half of a split view to the other.
- 9 Search, with previous and next
- Finds a part or a net; the arrows step between hits.
Two more buttons appear only when the board has something to show for them: a board photo button on boards that carry a photograph, and previous / next pin once a net is selected, to walk pad by pad along it.
Mouse
| Wheel | Zooms, centred on the cursor |
| Hover | Shows a tooltip with the component, pin and net under the cursor |
| Left-click | Selects a pin or component and highlights its net |
| Left-drag / right-drag / middle-drag | Pans |
| Double-click a pin | Searches that net in the linked schematic |
| Double-click a component body | Searches that component in the linked schematic |
Right-click menu
Find Net and Find Component — both naming the element you right-clicked — so you can say exactly which one you mean in the linked schematic.
17Reading a board
Clicking is the whole interface: click a part to see what it is, click a pad to light up everything else on that net.
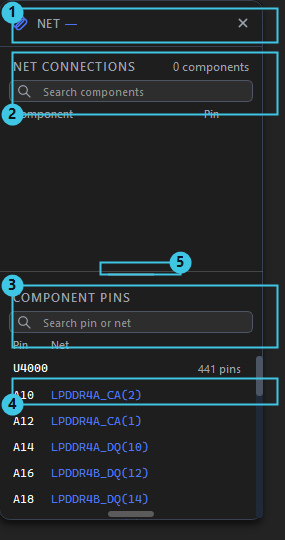
- 1 Panel header
- Names the selected net; the ✕ closes the panel.
- 2 Net connections
- Every part sitting on the selected net, with its pin. Searchable.
- 3 Component pins
- Every pad of the selected part, with the net each one carries. Also searchable — the quickest way to find one pin on a large IC.
- 4 A pin and its net
- Click a row to jump to that pad on the board.
- 5 The grip
- Drag to resize. Each grip resizes only the list directly above it — the other keeps the height you gave it. Double-click a grip to reset that list.
Trace layers
With trace layers on, the copper is drawn as well as the pads, so you can follow a track from one pad to the next. Clicking a trace then selects its net and lights every pad on it.
Many boardviews hold only pads, part outlines and the net list. On those the button still lights but the picture does not change — there is no trace data in the file to draw.
Ratsnest
Ratsnest draws a straight airwire between the pads of a net, which is how you see where a signal goes when the copper is on an inner layer you cannot see.
Click a pad, or search a net name; clicking a component body selects the component and draws nothing. On a large net such as GND it draws a line to every pad — hundreds, fanning from one point — so pick a signal net rather than a rail if you want it readable.
Diode readings
On boards that carry the data, diode readings prints the expected meter value beside each
pad as D:0.506, with OL where the reading is open. They appear only
past about 2× zoom, so they never clutter a whole-board view, and they also show in the pin
tooltip as you hover. It turns the boardview into a reference for what your multimeter
should be reading.
Readings are measurements taken from a known-good board, so only a handful of parts on any board carry them — usually the large ICs and the connectors worth probing.
18Using the schematic and board together
This is what the software is really for. Everything above is in service of this section. Open a schematic and a board file and put them side by side with PDF | PCB (§14).
How tabs get linked
Schematic and board tabs are paired automatically as you open them — the first schematic with the first board, and so on. Once paired, the link button ties the two together and cross-search starts working.
Cross-search — the fastest way to find a net
You are reading the schematic and you find the rail you want to check: VDD_MAIN.
Double-click it. W2R Schematics searches the linked board for it, highlights every
pad on that net, zooms to it, and brings the board tab forward. Put your probe down where it is
pointing.
It works from the board too. Double-click a pin and the schematic jumps to the page where that net appears and highlights it. If you want to be explicit about whether you are searching for a net or a component, right-click instead and choose Find Net or Find Component.
When there is no match, the app tells you so and stays where it is rather than switching tabs and leaving you looking at an unchanged board wondering whether it worked. A “no matches found” message means exactly that — the name in the schematic does not appear in the board file.
19The Hardware Solutions viewer
Hardware solutions are annotated repair guides — jumper routes, replacement parts, reball diagrams, drawn as layered artwork over the board. They open in their own read-only viewer.
| Left-drag | Pans |
| Wheel | Zooms |
| Double-click | Fits the drawing to the window, with a short animation |
| Click an object | Selects it and everything grouped with it, glowing cyan |
A floating Hardware Solutions card sits at the bottom right with the layer list. Toggle layers on and off, solo a single layer, or show them all — peeling back the repair drawing one layer at a time.
Solutions & tools
20Repair solutions
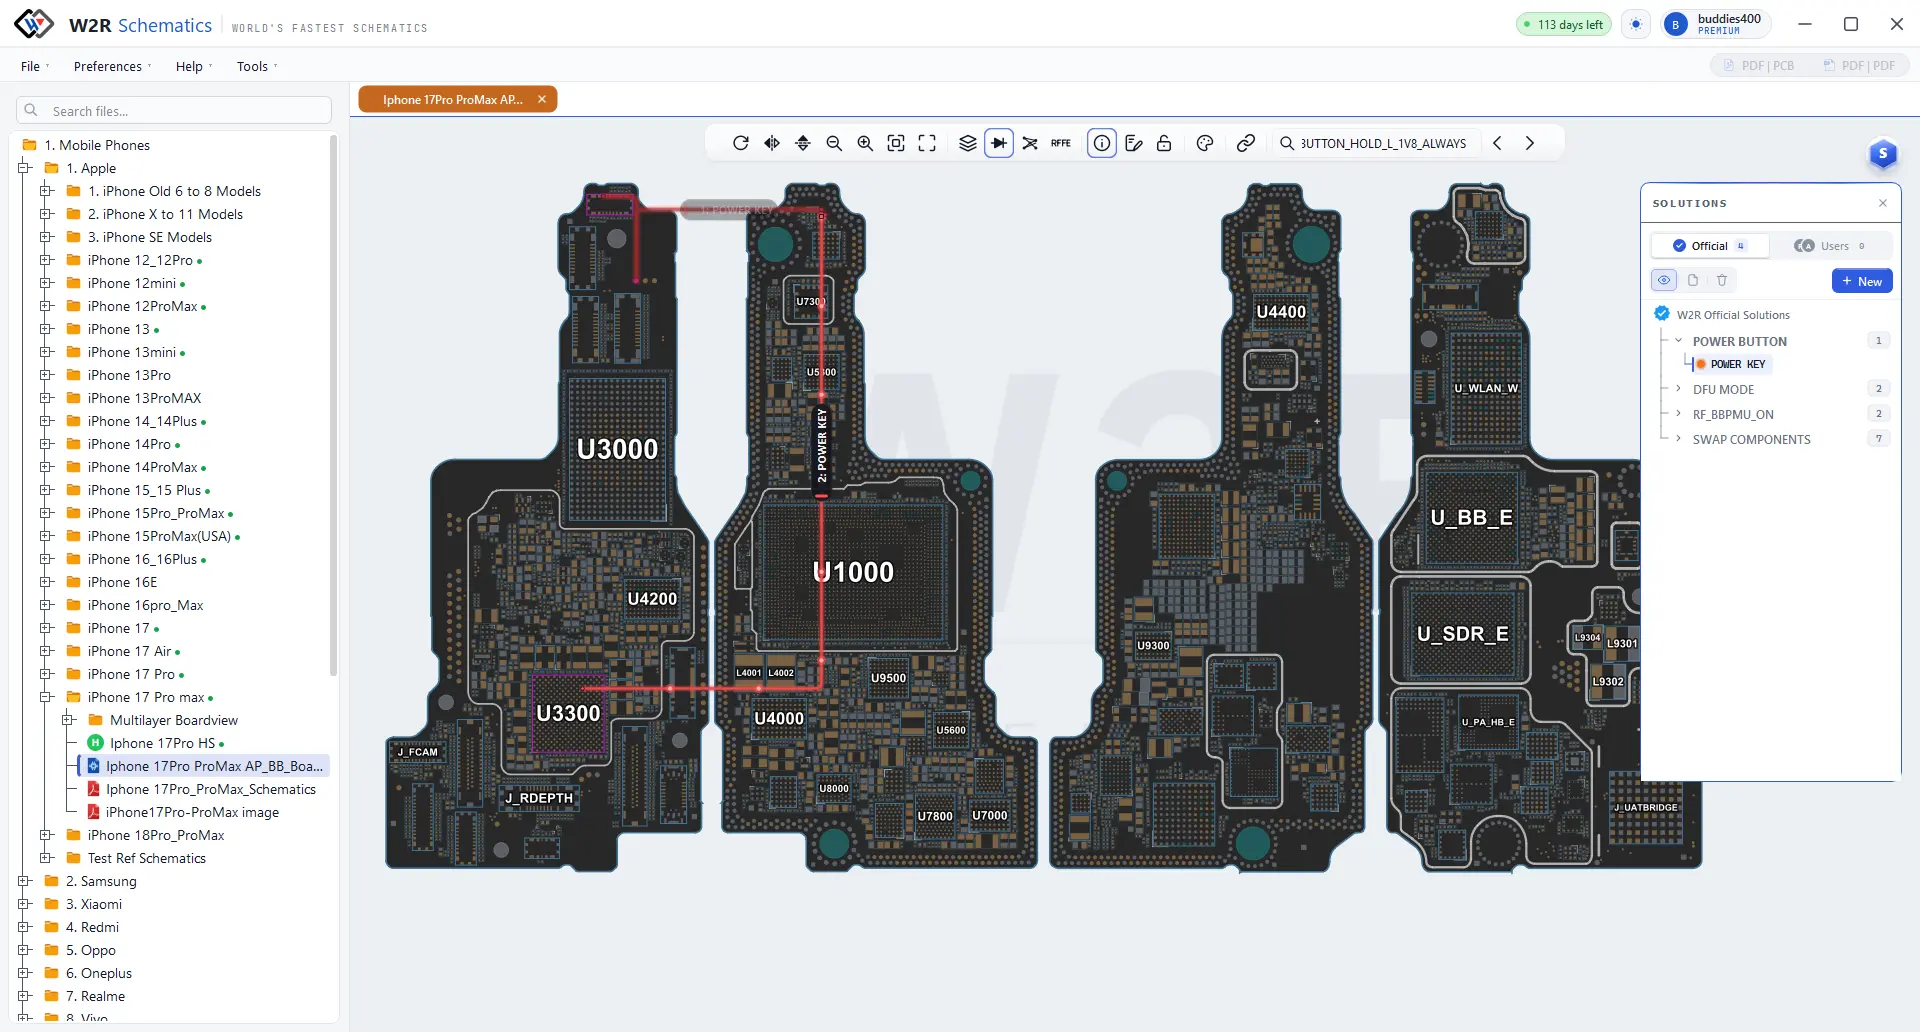
A repair solution is an annotated repair — jumper routes, replaced parts, a known-good procedure — pinned to the actual nets and components it concerns and drawn directly on the boardview. Instead of reading “check the nets around the charging IC,” you see those nets lit up on the board in front of you, and the next person does not have to work it out again.
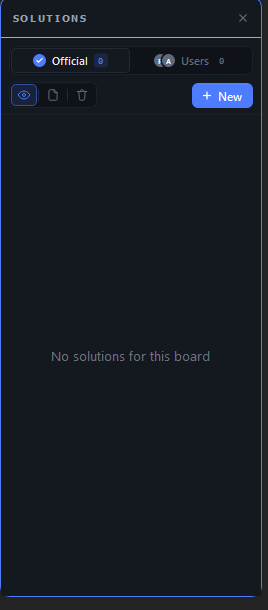
- Official · Users
- Who wrote it, each with a count. Official comes from the W2R team, Users from other technicians.
- Preview · duplicate · delete
- Act on the selected solution.
- + New
- Opens the editor to write your own — §21.
Working with the overlay
Pick a section and its nets and components are traced out on the board with a highlight. A legend panel appears listing each line in the solution as a clickable pill:
- Click a pill
- Shows or hides that net, and zooms to it
- Show All / Clear All
- The buttons in the legend header
- One-by-One mode
- Steps through the solution one net at a time — follow it like a checklist while you work
- Click a wire or pin on the board
- Focuses that net
Repair notes
Each section can carry a written note — what the fault looks like, what to check, what to replace. Net names inside a note are clickable: click one and the board focuses that net, so the written procedure and the physical board stay in step as you read.
21Writing your own solution
When you solve something worth keeping, save it as a solution — for yourself, and for everyone else working on the same board. + New in the solutions sidebar opens the editor: name the fault, mark the parts and connections on the board itself, and save.
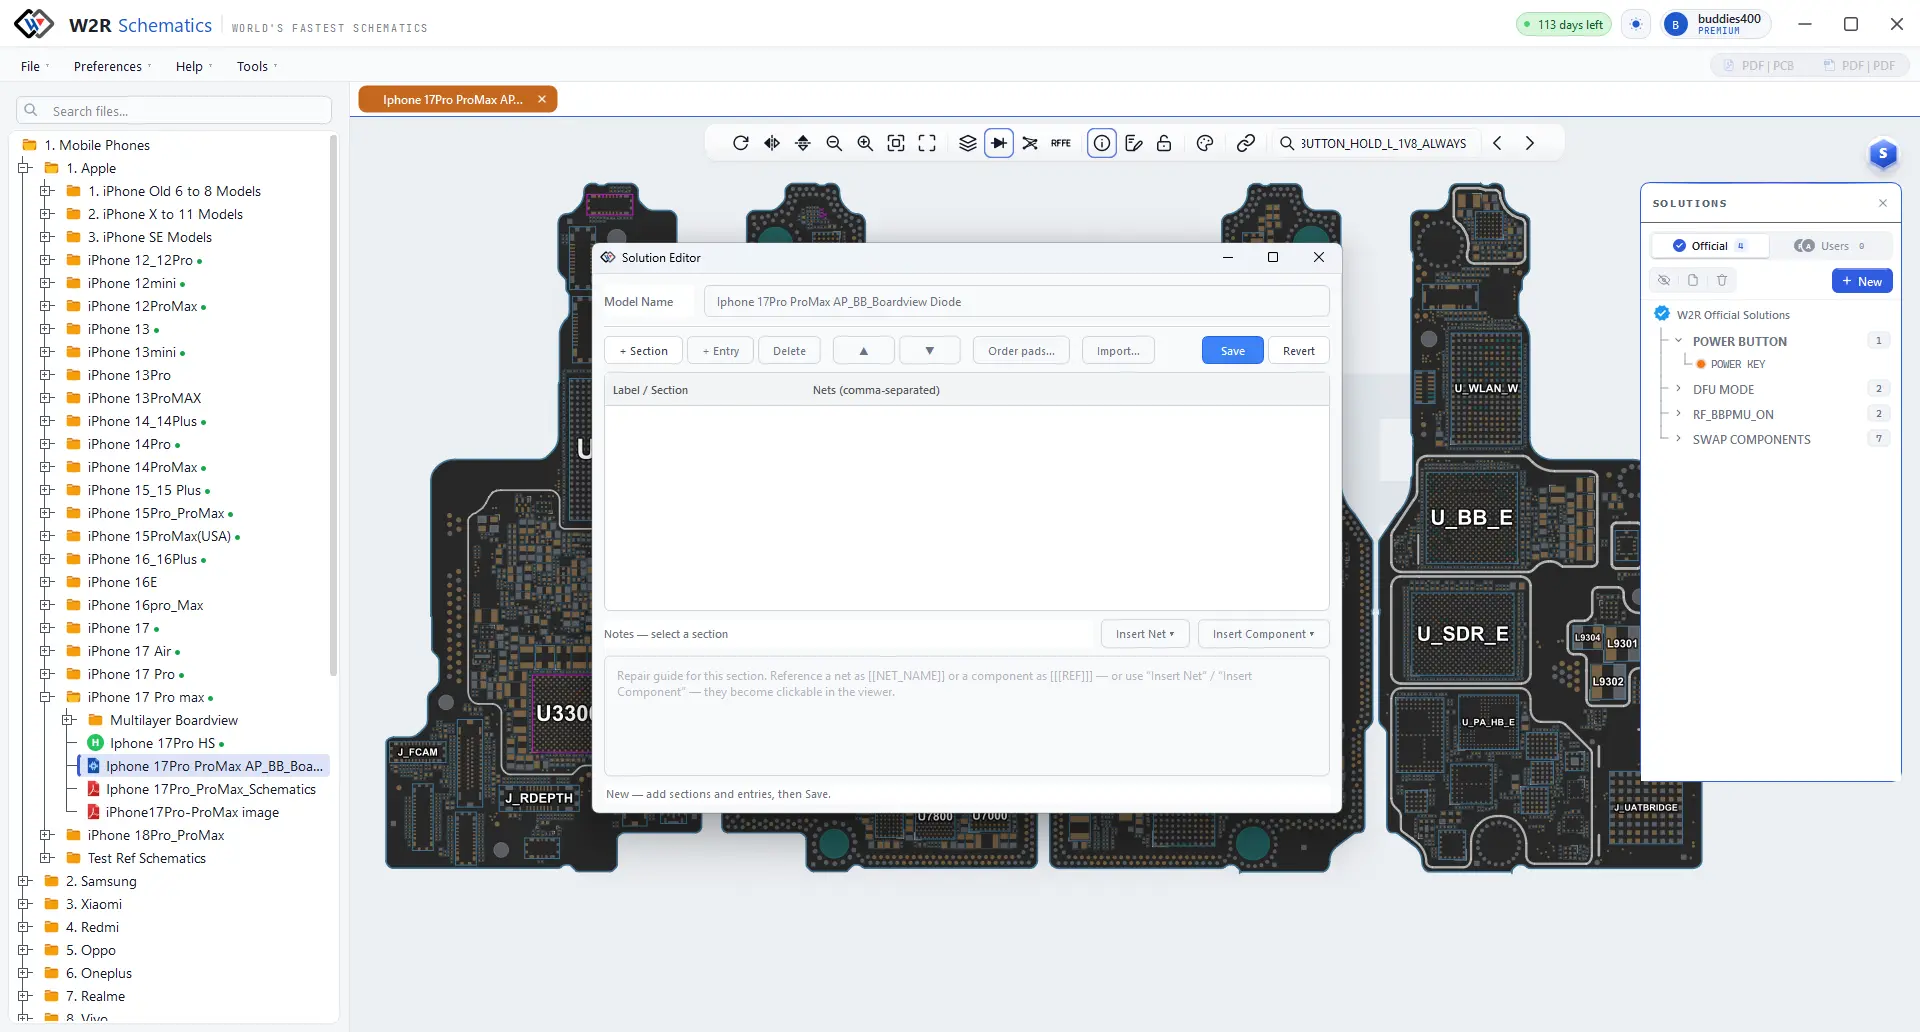
A solution is a list of sections — one per fault or procedure — and each section is a list of entries pairing a label with the nets it involves.
- + Section
- Adds a new fault or procedure
- + Entry
- Adds a labelled line of nets to the current section
- Delete
- Removes the selected row. The Delete key does the same.
- ▲ ▼
- Reorders rows — put the steps in the order you would actually do them
- Insert Net ▾
- In the notes pane. Drops a clickable net reference into the note, so readers can click straight from your words to the board.
- Save
- Saves the solution against this board.
- Revert
- Discards your unsaved changes
Double-click any cell to edit its label or its net list in place.
Your own solutions stay yours until you upload them. Once uploaded, other technicians working on the same board see it under Users, with your name on it.
22RFFE tools
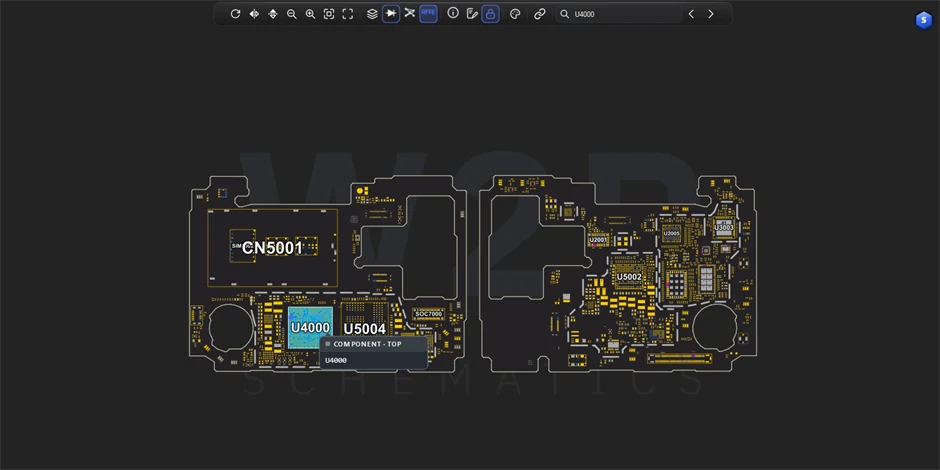
RF front-end work has its own panel, opened by the RFFE button on the board toolbar. It picks out the front-end devices on the open board and gives the bus detail for each, so the RFFE nets stand out from everything else on the board. Whether those highlights pulse or sit still is controlled by RFFE blink under Preferences → PCB Viewer (§24).
23CPU Finder
CPU Finder, in the Tools menu, opens a searchable table of phone models and the chipset each one uses — for when a board arrives with no markings you can read and you need to know what you are looking at.
- Search by brand, model or chipset. The table filters as you type and tells you how many of the total you are seeing.
- Right-click a row → Copy Chipset puts the chipset name on the clipboard, ready to paste into a parts search.
The window is non-modal — leave it open beside your board while you work.
Settings
24Preferences
Four submenus. Everything here is remembered between sessions.
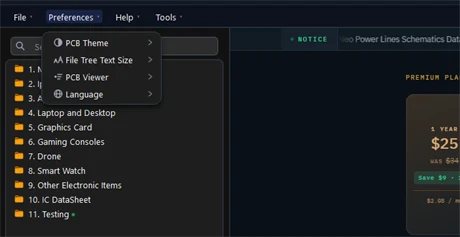
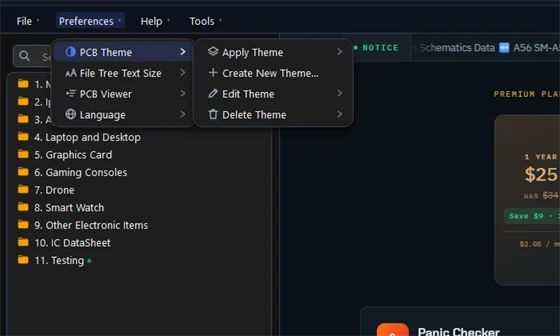
PCB Theme
File Tree Text Size
PCB Viewer — animation and blinking
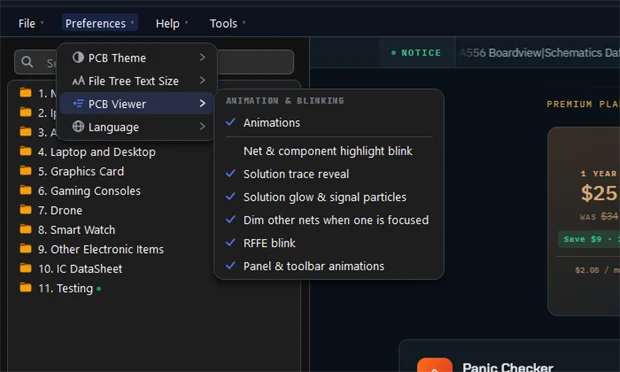
- Animations
- The master. Turning it off greys the six below but keeps their ticks, so switching it back on restores your choices rather than turning everything on.
- Net & component highlight blink
- Off by default. The pulsing sat on top of the very thing you are trying to read, so a highlighted net now stays lit and steady. Turn it on here if you prefer the old behaviour.
- Solution trace reveal
- Draws a solution's routes in as it opens.
- Solution glow & signal particles
- The moving emphasis on a solution's nets.
- Dim other nets when one is focused
- Fades everything that is not the selected net.
- RFFE blink
- Pulses the RF front-end highlights.
- Panel & toolbar animations
- The window's own movement — panels sliding, toolbars fading.
Language
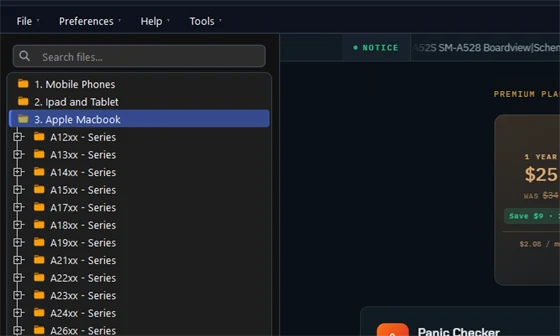
A language change takes effect after a restart — the translation loads once, as the application starts. The wording follows what technicians say at the bench rather than a word-for-word translation, which is why Suggest a wording fix is there: it opens WhatsApp so you can tell us where a word reads wrong.
25Appearance and board themes
App theme
The light / dark switch in the title bar changes the whole application, viewers included. Your choice is remembered.
Board themes
The board has its own colour themes, independent of the app theme — copper, pads, silkscreen, nets and highlights are all separately coloured. This matters more than it sounds: the right contrast makes a hairline trace visible that the wrong one hides.
- Apply Theme → Theme 1–4
- Switches between the four presets; the tick shows which is live.
- Create New Theme…
- Opens the theme editor, where every board element has its own colour picker.
- Edit Theme · Delete Theme
- List your own themes once you have saved one. The four presets are protected and cannot be edited or deleted — create your own instead.
- Board colour button
- On the board toolbar: a quick switch between Graphite, Navy and Plum (§16).
The board background is set by the application for light and dark mode and is not part of a theme, so a theme you make looks right in both.
26Your account
The account chip in the top-right corner opens the profile card.
| Row | Means |
|---|---|
| Username | The name you sign in with, and the one support will ask for |
| Plan | Free, Trial or Premium |
| Expiry date | When it lapses, with the days remaining — the same number as the pill in the title bar |
| Last login | The previous sign-in. Worth a look if you suspect someone else has your password |
| Auto login | Turn the automatic sign-in on or off from here. With it on, the app signs you in on launch and goes straight to the library — turn it off on a shared machine |
| System diagnostics | Hardware status, Windows version, architecture and machine name — support will ask for these if activation misbehaves |
A lapsed plan refuses sign-in with a specific message rather than quietly degrading. Renew from the home page, or through the WhatsApp button on a plan card.
27Updates
W2R Schematics checks its version when you sign in. If a newer one is available you get an Update Available dialog with Update Now and Later. Choosing Update Now downloads the new installer — with a progress bar in the dialog — and runs it.
After an update, a What's New dialog appears once, listing what changed.
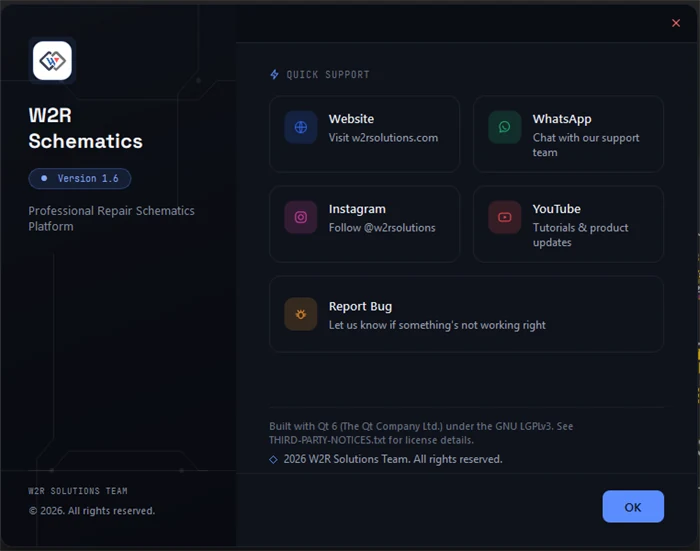
Your current version is in Help → About, along with the website, WhatsApp, Instagram and YouTube links.
Reference
28Keyboard shortcuts
Anywhere in the app
| Ctrl+Tab | Next tab |
| Ctrl+Shift+Tab | Previous tab |
| Ctrl+T | New tab |
| Ctrl+Shift+T | Reopen the last closed tab |
| F11 | Full screen on / off, in either viewer |
| Esc | Leave full screen; close a panel or dialog; cancel a download |
File tree
| Ctrl++ / − | Tree text bigger / smaller |
| Ctrl+0 | Tree text back to default |
Boardview viewer
| Ctrl+F | Search a part or net |
| Ctrl+wheel | Zoom |
| + / − | Zoom in / out |
| Home | Fit board to view |
| Ctrl+← / → | Rotate left / right |
| ← → ↑ ↓ | Pan |
Schematic viewer — search
| Ctrl+F | Search box |
| Enter / F3 | Next result |
| Shift+Enter / Shift+F3 | Previous result |
| Ctrl+C | Copy selected text |
| Esc | Clear selection and results |
Schematic viewer — navigation
| Page Up / Page Down | Scroll one screen |
| ↑ / ↓ | Scroll |
| ← / → | Scroll sideways |
| Ctrl+← / → | Previous / next page |
| Home | Top of document |
| End | End of document |
| Ctrl+End | Last page |
Schematic viewer — zoom
| Ctrl+wheel | Zoom at the cursor |
| Ctrl+0 | Fit page |
| Ctrl+Shift+0 | Fit width |
| Ctrl+1 … 6 | 50% · 100% · 150% · 200% · 400% · 800% |
Mouse — worth memorising
| Wheel | Zoom at the cursor, in both viewers |
| Double-click a word in the schematic |
Find it on the linked board |
| Double-click a pin on the board |
Find that net in the linked schematic |
| Right-drag | Pan, in both viewers |
The tree shortcuts only work while the tree itself has focus — which is why the same actions also sit in Preferences → File Tree Text Size, where they work from anywhere.
29Troubleshooting
Sign-in and account messages
| Message | Means | Do |
|---|---|---|
| Hardware ID error · device limit | The licence is held by another machine | Use HD Reset (§9) |
| Limit of 3 hardware ID resets | Three already used in the last 30 days | Wait — the message names the date — or contact support |
| No device is currently registered | Nothing to release | Just sign in; the new machine is claimed |
| Account Blocked | The account is suspended | Contact support on WhatsApp |
| Plan Expired | The subscription has lapsed | Renew from the home page |
| Upgrade Required | A paid feature on a free plan | Use the activation-key button in the dialog |
| Account Not Activated | The account exists but was never activated | Contact support |
| “Your session is expired so please logout and relogin.” | The sign-in token went stale mid-session | File → Logout, then sign in again |
| Unable to connect to the server | The app cannot reach W2R although the browser can | Usually antivirus or a proxy inspecting the connection — support has a diagnostic script |
Most failure dialogs carry a Contact support on WhatsApp button with your username already filled in, so you never have to explain who you are.
Other problems
| Symptom | Cause and fix |
|---|---|
| The app will not start on Windows 11 | Smart App Control is blocking it. Turn it off in Windows Security → App & Browser Control → Smart App Control settings → Off, then restart the computer. |
| “Missing Components” banner above the library | The Visual C++ Redistributable is missing. Click the Fix button in the banner and the app installs it for you. |
| “Already running” | Only one copy can run at a time. Look for the existing window, or end the process in Task Manager if it has hung. |
| Something else looks wrong | Run Panic Checker from the home page (§11) — it checks the application and the machine and reports what would stop it working. |
| Boards render slowly, or the schematic is blank | Usually a machine with no usable graphics driver. W2R Schematics falls back to software rendering automatically, but it will be slower. Update your graphics driver, and prefer the recommended specification in §4. |
| “Tab limit (10) reached” | Ten schematics and ten boards is the maximum. Close one. |
| Downloads stop working partway through the day | Trial and free plans carry a daily download limit. Wait for the cooldown, or upgrade. |
| A file will not open | Close the tab and open it again from the library — the download may have been interrupted. If it still fails, contact support with the model name. |
| Cross-search finds nothing | The net or component name in the schematic genuinely does not appear in the board file — the two documents do not always use identical naming. Try Find Net versus Find Component explicitly from the right-click menu, or search a shorter fragment of the name. |
| Trace layers or ratsnest show nothing | Trace layers need copper data in the file, and ratsnest needs a net selected, not a part — see §17. |
| The app crashed | A crash dialog appears with Send Report & Restart. Sending the report helps get it fixed. Report Bug in Help → About works too. |
30Support
| Website | w2rsolutions.in |
| +91 91505 49628 | |
| @w2r_schematics | |
| YouTube | @w2rsolutions |
Account problems — blocked accounts, expired plans, activation keys, device resets — are fastest on WhatsApp. The dialogs in the app that report these problems have a WhatsApp button that opens the chat with your username already filled in, so use that rather than typing it out.